Building, Running, Testing
Docker Image Name
The patch in config/manager/manager_image_patch.yaml will be applied to the manager pod.
Right now there is a placeholder IMAGE_URL, which you will need to change to your actual image.
Development Images
It’s likely that you will want one location and tag for release development, and another during development.
The approach most Cluster API projects is using a Makefile that uses sed to replace the image URL on demand during development.
Deployment
cert-manager
Cluster API uses cert-manager to manage the certificates it needs for its webhooks.
Before you apply Cluster API’s yaml, you should install cert-manager
kubectl apply -f https://github.com/cert-manager/cert-manager/releases/download/<version>/cert-manager.yaml
Cluster API
Before you can deploy the infrastructure controller, you’ll need to deploy Cluster API itself to the management cluster.
You can use a precompiled manifest from the release page, run clusterctl init, or clone cluster-api and apply its manifests using kustomize:
cd cluster-api
make envsubst
kustomize build config/default | ./hack/tools/bin/envsubst | kubectl apply -f -
Check the status of the manager to make sure it’s running properly:
kubectl describe -n capi-system pod | grep -A 5 Conditions
Conditions:
  Type              Status
  Initialized       True
  Ready             True
  ContainersReady   True
  PodScheduled      True
Your provider
In this guide, we are building an infrastructure provider. We must tell cluster-api and its developer tooling which type of provider it is. Edit config/default/kustomization.yaml and add the following common label. The prefix infrastructure- is used to detect the provider type.
commonLabels:
  cluster.x-k8s.io/provider: infrastructure-mailgun
Now you can apply your provider as well:
cd cluster-api-provider-mailgun

# Install CRD and controller to current kubectl context
make install deploy

kubectl describe -n cluster-api-provider-mailgun-system pod | grep -A 5 Conditions
Conditions:
  Type              Status
  Initialized       True
  Ready             True
  ContainersReady   True
  PodScheduled      True
Tiltfile
Cluster API development requires a lot of iteration, and the “build, tag, push, update deployment” workflow can be very tedious. Tilt makes this process much simpler by watching for updates, then automatically building and deploying them.
See Developing Cluster API with Tilt on all details how to develop both Cluster API and your provider at the same time. In short, you need to perform these steps for a basic Tilt-based development environment:
- Create file
tilt-provider.yamlin your provider directory:
name: mailgun
config:
  image: controller:latest # change to remote image name if desired
  label: CAPM
  live_reload_deps: ["main.go", "go.mod", "go.sum", "api", "controllers", "pkg"]
- Create file
tilt-settings.yamlin the cluster-api directory:
default_registry: "" # change if you use a remote image registry
provider_repos:
  # This refers to your provider directory and loads settings
  # from `tilt-provider.yaml`
  - ../cluster-api-provider-mailgun
enable_providers:
  - mailgun
- Create a kind cluster. By default, Tiltfile assumes the kind cluster is named
capi-test.
kind create cluster --name capi-test

# If you want a more sophisticated setup of kind cluster + image registry, try:
# ---
# cd cluster-api
# hack/kind-install-for-capd.sh
- Run
tilt upin the cluster-api folder
You can then use Tilt to watch the container logs.
On any changed file in the listed places (live_reload_deps and those watched inside cluster-api repo), Tilt will build and deploy again. In the regular case of a changed file, only your controller’s binary gets rebuilt, copied into the running container, and the process restarted. This is much faster than a full re-build and re-deployment of a Docker image and restart of the Kubernetes pod.
You best watch the Kubernetes pods with something like k9s -A or watch kubectl get pod -A. Particularly in case your provider implementation crashes, Tilt has no chance to deploy any code changes into the container since it might be crash-looping indefinitely. In such a case – which you will notice in the log output – terminate Tilt (hit Ctrl+C) and start it again to deploy the Docker image from scratch.
Your first Cluster
Let’s try our cluster out. We’ll make some simple YAML:
apiVersion: cluster.x-k8s.io/v1beta1
kind: Cluster
metadata:
  name: hello-mailgun
spec:
  clusterNetwork:
    pods:
      cidrBlocks: ["192.168.0.0/16"]
  infrastructureRef:
    apiVersion: infrastructure.cluster.x-k8s.io/v1alpha1
    kind: MailgunCluster
    name: hello-mailgun
---
apiVersion: infrastructure.cluster.x-k8s.io/v1alpha1
kind: MailgunCluster
metadata:
  name: hello-mailgun
spec:
  priority: "ExtremelyUrgent"
  request: "Please make me a cluster, with sugar on top?"
  requester: "cluster-admin@example.com"
We apply it as normal with kubectl apply -f <filename>.yaml.
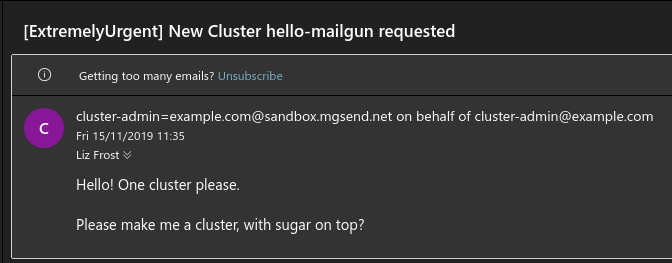
If all goes well, you should be getting an email to the address you configured when you set up your management cluster:

Conclusion
Obviously, this is only the first step. We need to implement our Machine object too, and log events, handle updates, and many more things.
Hopefully you feel empowered to go out and create your own provider now. The world is your Kubernetes-based oyster!